
Table of Contents
- Section 1 – What is a Slicer
- Section 2 – Top Slicer Software Options: A Comprehensive Comparison
- Section 3 – Getting Started: Beginner-Friendly Slicer Features
- Section 4 – Learning Resources: Tutorials and Guides
- Section 5 – Advanced Techniques: Customizing Slicer Settings for Precision
- Section 6 – Troubleshooting Common Slicer Issues
- Section 7 – The Role of Slicers in Optimizing Print Quality
- Section 8 – Plugins and Add-Ons for Enhanced Slicing Performance
- Section 9 – Future of Slicer Software: Integrating AI and Automation
- Section 10 – Glossary of Splicer Software Terms
- Section 11 – Summary: Unlock the Power of Slicer Software
1. What is Slicer Software?
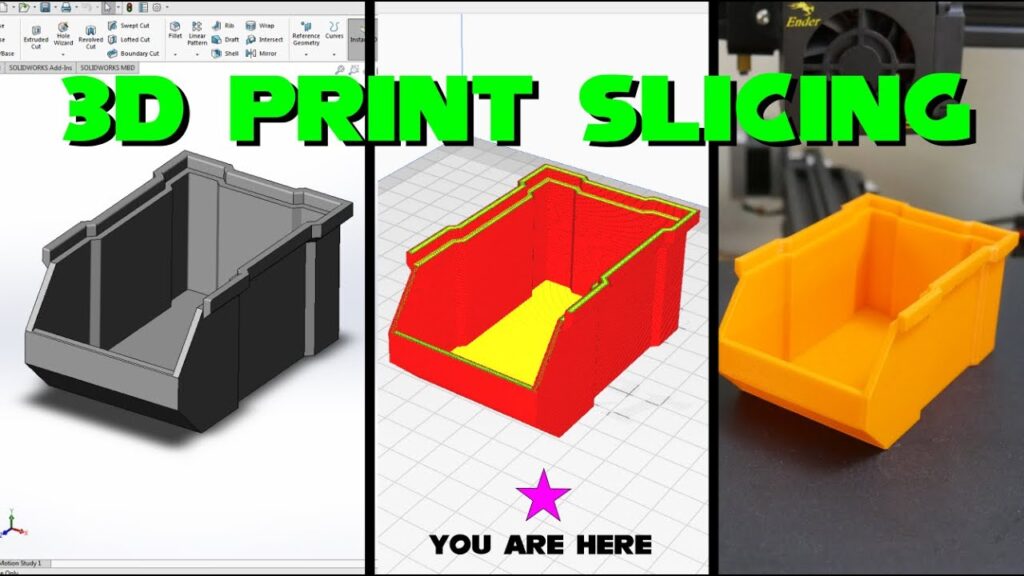
Imagine crafting a perfectly designed 3D model on your computer using 3D printing software. It looks flawless on the screen—but how do you bring that digital vision into the physical world? This is where slicer software steps in as the crucial middleman between your creative ideas and your 3D printer.
Slicer software is a specialized tool that processes your 3D model, slicing it into horizontal layers, which are then converted into G-code. G-code is the language your printer understands, containing instructions for every aspect of the printing process—such as the movement of the nozzle, print speed, and the specific temperatures required for the material. Understanding what G-code is and how it works in 3D printing is foundational for achieving reliable and accurate results.
At its core, slicer software transforms 3D objects into highly detailed blueprints for the printer, addressing factors like layer height, infill patterns, and support structures. It provides fine-grained control over these settings, ensuring you can tailor your print to meet specific needs. Whether you’re focusing on print strength, visual aesthetics, or speed, slicer software is the key to unlocking the full potential of your 3D printer.
The Magic of Layering
A fundamental concept in 3D printing is layering. When a slicer divides your model into layers, it determines how thick or thin each slice should be—this is referred to as layer height. Thinner layers create smoother surfaces and greater detail but take longer to print. On the other hand, thicker layers speed up the process but might compromise finer details. Adjusting the layer height according to the project requirements is one of the first steps in using slicer software effectively.
Another critical setting is infill pattern—the internal structure of the print. Slicer software offers various patterns such as grid, honeycomb, or gyroid, each balancing strength, material usage, and print time differently. Choosing the right infill can ensure the durability of functional parts or optimize material efficiency for decorative prints.
Why Slicer Software is Indispensable
The importance of slicer software lies in its versatility. Whether you’re a beginner printing your first object or an experienced maker working on complex prototypes, slicer software gives you the control needed to adapt to any scenario. A beginner might rely on pre-configured profiles to ensure a smooth start, while advanced users dive into customized settings to meet unique design requirements.
For instance, if you’re tackling a challenging print with overhangs or intricate geometries, slicer software lets you generate support structures that stabilize the model during the printing process. These supports can later be removed to reveal a clean finish. Without this feature, many ambitious designs would be impossible to print.
Personal Anecdote: Turning Frustration into Mastery
I once worked with a beginner who struggled to get clean results from their 3D printer. Every attempt produced uneven layers and visible gaps, leaving them frustrated. After reviewing their slicer settings, we discovered the problem stemmed from a mismatch between the nozzle size and the layer height they had chosen. By adjusting the layer height to align with the nozzle’s capabilities and increasing the infill density for added strength, their next print turned out beautifully.
This experience highlights why learning to use slicer software effectively is so vital—it transforms frustration into mastery and opens up new possibilities for creativity.
Beyond Basics: The Power of Customization
While pre-configured settings are great for getting started, slicer software truly shines when you explore its advanced capabilities. Features like dynamic layer height allow the software to automatically adjust layer thickness throughout the print, optimizing both speed and detail. For example, it might use thinner layers for intricate details at the top of a model and thicker layers for the more straightforward sections below.
Learning how to create custom supports in Cura slicer is another game-changer. Custom supports let users precisely control where additional material is added to stabilize the print, reducing waste and improving the final quality.
Conclusion: Slicer Software as the Architect of Your Prints
Slicer software is more than just a tool—it’s the architect of your 3D printing process. By converting your designs into printer-ready instructions, it empowers you to turn concepts into reality with precision and creativity.
Whether you’re working on a decorative model for display or a functional part for everyday use, slicer software ensures your prints are optimized for success. It’s the secret weapon that bridges the gap between imagination and creation, enabling both beginners and experts to achieve their 3D printing goals.
Back to Top2. Top Slicer Software Options: A Comprehensive Comparison

Choosing the right slicer software is one of the most critical decisions you’ll make in your 3D printing journey. Whether you’re a hobbyist seeking simplicity or a professional requiring advanced capabilities, your choice of slicer impacts everything from print quality to workflow efficiency. In this section, we’ll explore the strengths, limitations, and ideal use cases for three standout slicer options—Cura, PrusaSlicer, and Simplify3D—along with some alternatives.
Slicer Software Feature Comparison
| Feature | Cura | PrusaSlicer | Simplify3D | KISSlicer | Lychee |
|---|---|---|---|---|---|
| Ease of Use | ✔ Beginner-Friendly | ✔ Balanced | ⚠ Steep Learning Curve | ✔ Simple Interface | ✔ User-Friendly |
| Free to Use | ✔ Yes | ✔ Yes | ✘ No (Paid) | ✔ Yes | ✔ Yes |
| Multi-Material Printing | ⚠ Basic Support | ✔ Excellent | ✔ Advanced | ✘ Limited | ✘ Limited |
| Custom Supports | ✔ Yes | ✔ Yes | ✔ Highly Customizable | ✘ Limited | ⚠ Basic |
| SLA/Resin Printing | ✘ No | ✘ No | ✘ No | ✘ No | ✔ Optimized |
| Community Support | ✔ Strong | ✔ Active | ⚠ Moderate | ⚠ Niche Users | ✔ Growing |
| Plugins/Add-Ons | ✔ Extensive | ✔ Moderate | ✘ None | ✘ None | ✔ Moderate |
Key:
- ✔: Fully Supported
- ⚠: Limited or Basic Functionality
- ✘: Not Supported
Cura: Open-Source Versatility

Developed by Ultimaker, Cura is often hailed as the gold standard for free slicer software. Its open-source nature makes it accessible to hobbyists, schools, and professionals alike. Beginners benefit from pre-configured profiles tailored to specific printers and filament types, while advanced users can access over 400 adjustable settings for fine-tuned control.
Strengths:
- User-Friendly Interface: Beginners can get started with minimal guidance, thanks to Cura’s intuitive layout.
- Community Support: A large user base and active forums mean solutions to common issues are readily available.
- Custom Features: Tools like the custom supports plugin for Cura slicer allow users to tackle complex designs without compromising on quality.
Limitations:
While powerful, Cura can sometimes be overwhelming for newcomers due to its sheer range of options. Additionally, its support for multi-material printing is less robust than some competitors.
Ideal Users:
Cura is perfect for those who need versatility without a price tag. It shines in educational environments and for hobbyists looking to experiment with different settings.
PrusaSlicer: Precision for Multi-Material Printing

PrusaSlicer, originally based on Slic3r, has evolved into a top-tier slicer packed with innovative features. Its seamless integration with Prusa printers makes it a favorite among professionals and enthusiasts, but it’s also compatible with other machines.
Strengths:
- Multi-Material Handling: PrusaSlicer is ideal for multi-material 3D printing projects, offering robust support for advanced designs.
- Ease of Use: Its clean interface balances simplicity with depth, making it beginner-friendly yet powerful.
- Frequent Updates: A dedicated development team ensures consistent improvements based on user feedback.
Limitations:
PrusaSlicer’s strengths come with a learning curve. Users new to multi-material printing may need time to fully understand its capabilities.
Ideal Users:
This slicer is a great fit for professionals handling complex designs or anyone working with Prusa printers.
Simplify3D: The Premium Choice
For users seeking ultimate control and precision, Simplify3D stands out as a paid option with unmatched capabilities. Designed for professionals, it delivers optimized slicing performance and detailed troubleshooting options.
Strengths:
- Advanced Features: Simplify3D excels in areas like optimizing slicing features for challenging projects, offering tools to refine every detail of your prints.
- High Performance: Its streamlined slicing algorithms ensure faster processing compared to free alternatives.
- Support Structures: The ability to manually customize support placement gives users unparalleled control.
Limitations:
Simplify3D’s price point makes it less appealing for casual users. Additionally, its lack of free trials can be a barrier to adoption.
Ideal Users:
This slicer is designed for professionals handling intricate or high-volume printing jobs.
Alternatives to Consider
While Cura, PrusaSlicer, and Simplify3D dominate the market, there are other options worth exploring:
KISSlicer:
A lightweight slicer offering efficient performance for hobbyists, especially in resin printing. Ideal for users needing straightforward solutions without unnecessary features.
Lychee Slicer:
Perfect for resin printing enthusiasts, Lychee combines user-friendly tools with advanced options like adaptive layer heights.
Chitubox:
A popular choice for SLA (resin) printing, Chitubox is designed to streamline workflows for hobbyists and small businesses.
Real-World Insight: Matching the Slicer to Your Needs
I once worked with a designer handling a complex architectural project. They initially struggled with Cura’s settings, which didn’t offer the precision they needed for intricate designs. Switching to PrusaSlicer provided the advanced tools required to manage multi-material prints with accuracy. This experience underscores the importance of matching your slicer software to the demands of your projects.
Why Choosing the Right Slicer Matters
Selecting the ideal slicer software ensures compatibility with your printer, minimizes errors, and maximizes print quality. Whether you need Cura slicer beginner tips to start simple or advanced slicing features explained in Simplify3D for professional challenges, the right software is the cornerstone of a successful workflow.
Back to Top3. Getting Started: Beginner-Friendly Slicer Features
Starting your 3D printing journey can be exciting but also overwhelming—especially when you encounter the vast array of slicer software options and settings. Thankfully, slicer software like Cura, PrusaSlicer, and others are designed with beginner-friendly features that make it easy for anyone to get started. This section will guide you through the foundational tools and techniques to build confidence in using slicer software.
Pre-Configured Profiles: Your Easiest First StepBack to Top
Many slicer programs come equipped with pre-configured profiles that eliminate the guesswork for beginners. These profiles are tailored to specific 3D printers, filament types, and layer heights, enabling users to achieve satisfactory results without diving into complex settings. For example, Cura offers profiles for common printers like the Ender 3 and filament types like PLA and PETG.
With pre-configured profiles, the software automatically adjusts crucial parameters like:
- Layer Height: The thickness of each layer.
- Print Speed: Determines how fast the printer moves while extruding.
- Infill Percentage: The density of the internal support structure.
By starting with these default settings, you can focus on learning the basics of your printer and materials before experimenting with more advanced features.
Anecdote:
I once guided a friend who was completely new to 3D printing. They used Cura’s default PLA profile for their Creality Ender 3, and their very first print—a small keychain—came out nearly flawless. Seeing how quickly they gained confidence reminded me of the importance of starting with pre-configured settings.
Essential Features to Master
As you gain experience, understanding key slicer settings will help you customize prints to better suit your needs. Here are the foundational settings to focus on:
1. Layer Height
This determines the resolution of your print. A lower layer height (e.g., 0.1 mm) results in smoother surfaces, while a higher layer height (e.g., 0.3 mm) reduces print time. Beginners often start with a mid-range height (e.g., 0.2 mm) for a good balance between quality and speed.
2. Infill Density and Pattern
Infill affects the strength and weight of your model. For decorative items, a low infill percentage (e.g., 10%) is sufficient. Functional parts, however, require higher infill (e.g., 50% or more). Patterns like grid, honeycomb, or gyroid are available, and each has unique advantages in terms of strength and material usage.
3. Bed Adhesion
Ensuring your print sticks to the print bed is essential for success. Beginners can use features like brim or raft, which create extra material around the base of your print to improve adhesion.
4. Supports
If your model has overhangs or complex geometries, slicer software can automatically generate support structures to prevent sagging. Understanding how to enable and adjust supports is key for tackling ambitious designs.
Avoiding Common Mistakes
It’s easy to run into issues when you’re just starting out. Here are some common mistakes beginners make—and how to avoid them:
- Ignoring Nozzle Size: Ensure that your layer height is compatible with your printer’s nozzle size. A good rule of thumb is to set the layer height to 25%-75% of the nozzle diameter.
- Skipping Bed Leveling: Always check that your print bed is properly leveled. Uneven surfaces lead to poor adhesion and failed prints.
- Wrong Filament Settings: Using the wrong temperature settings for your filament can cause under-extrusion or stringing. Refer to the filament’s packaging for recommended temperatures.
Experimenting with Test Models
To familiarize yourself with slicer settings, it’s helpful to print small test models. Popular options include calibration cubes, benchy boats, or overhang tests. These models help you evaluate:
- Surface quality.
- Dimensional accuracy.
- How well your printer handles overhangs and fine details.
By printing these simple designs, you’ll quickly identify areas for improvement without wasting too much filament.
Back to Top4. Learning Resources: Tutorials and Guides
Slicer software developers provide an abundance of resources for beginners. Cura, for instance, offers a step-by-step tutorial on how to use slicer software for beginners, covering everything from importing your model to choosing print settings. YouTube channels and online forums are also fantastic places to learn from experienced users.
External resource: Cura beginner tutorial [ultimaker.com/software/ultimaker-cura].
Personal Anecdote: The Learning Curve
I recently assisted a group of students working on a class project to print an educational model of a molecule. Initially, their prints suffered from poor adhesion and messy supports. By tweaking just a few settings—such as enabling a raft for better bed adhesion and lowering the print speed—they achieved perfect results on their next attempt. This experience reinforced how small changes in slicer settings can make a world of difference for beginners.
Building a Foundation for Success
Getting started with slicer software doesn’t have to be intimidating. By relying on beginner-friendly profiles, focusing on essential settings, and learning from simple test prints, you’ll build the skills and confidence needed to tackle more complex projects. Remember, every mistake is a valuable learning opportunity—so don’t hesitate to experiment.
With practice, you’ll discover that slicer software isn’t just a tool—it’s a gateway to unlocking your full creative potential in 3D printing.
Back to Top5. Advanced Techniques: Customizing Slicer Settings for Precision
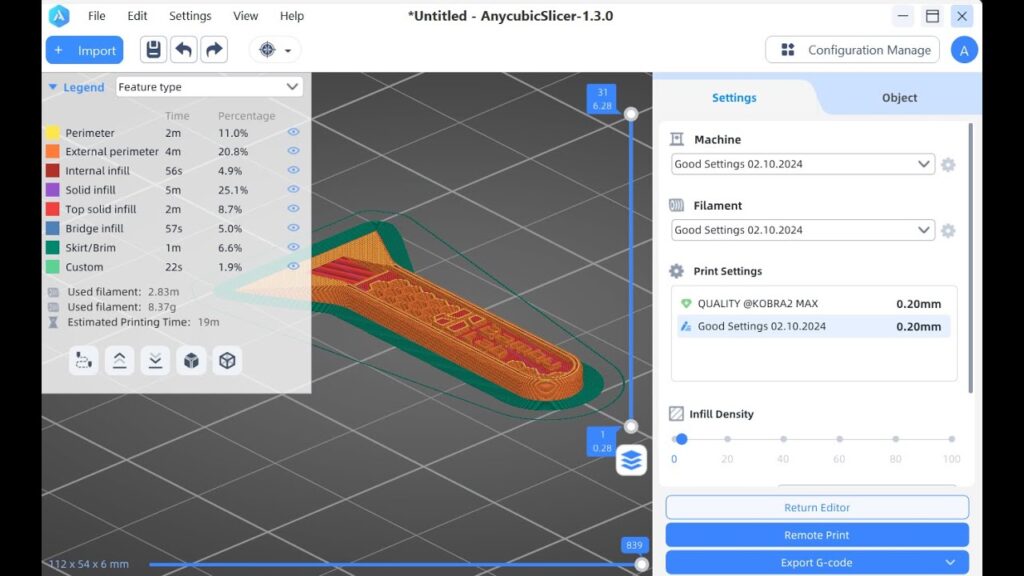
Once you’ve mastered the basics of slicer software, it’s time to unlock its true potential with advanced customization. Adjusting settings like dynamic layer heights, custom supports, and multi-material configurations allows you to tailor every print to meet your specific needs. These techniques ensure not only better aesthetics and accuracy but also more efficient use of time and materials.
Dynamic Layer Heights for Balanced Detail and Speed
Dynamic layer height is an advanced feature that adjusts the thickness of layers throughout the print. It combines the best of both worlds: thick layers for faster printing in less-detailed areas and thin layers for intricate, high-resolution sections.
For instance, imagine printing a figurine with a detailed face but a simple base. Dynamic layer height allows the slicer to use 0.1 mm layers for the face and 0.3 mm layers for the base, speeding up the process without sacrificing quality where it matters.
How to Use dynamic layer heights in slicer software:
- Activate the Setting: Most slicers like Cura and PrusaSlicer have an option to enable dynamic layer heights.
- Set a Range: Specify the minimum and maximum layer heights (e.g., 0.1 mm to 0.3 mm).
- Preview the Layers: Use the slicer’s layer visualization tool to ensure the settings optimize both speed and detail.
Custom Supports for Complex Prints
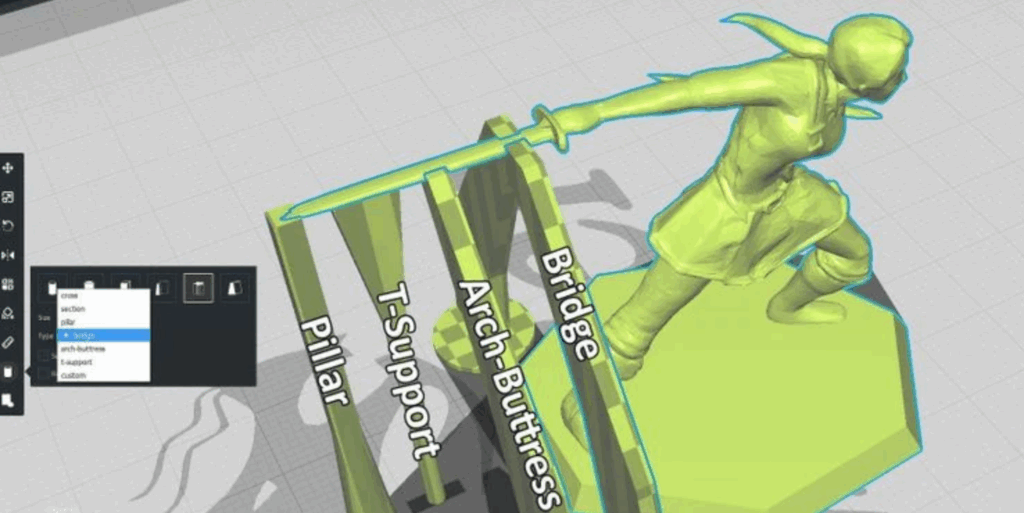
Support structures are essential for stabilizing overhangs and intricate designs, but the default settings in slicer software can sometimes be inefficient or excessive. Custom supports allow you to manually place support material only where it’s needed, reducing waste and improving the surface finish of the final print.
For example, when printing a model with a single overhanging arm, default supports might fill the entire area beneath the model, wasting filament and time. By learning how to create custom supports in Cura slicer, you can target only the arm, leaving the rest of the model untouched.
Benefits:
- Material Savings: Use support structures sparingly to minimize filament usage.
- Cleaner Prints: Reduce unnecessary contact points to improve surface quality.
- Greater Control: Optimize supports for better stability during printing.
Anecdote:
I worked with an artist who was printing a detailed sculpture with multiple delicate overhangs. They initially struggled with excessive supports, which left blemishes on the finished piece. After using Cura’s custom supports feature, they were able to precisely target only the critical areas, resulting in a flawless print.
Multi-material 3D printing tips for advanced users
Multi-material printing involves using two or more filaments in a single print, allowing for stunning visual effects, enhanced functionality, or both. Advanced slicers like PrusaSlicer and Simplify3D excel in this area, making it easier to produce models with multiple colors, flexible joints, or dissolvable supports.
Applications:
- Aesthetic Prints: Combine vibrant colors for eye-catching designs.
- Functional Prototypes: Use rigid materials for structure and flexible materials for hinges or grips.
- Dissolvable Supports: Print with PVA or HIPS filaments, which can be dissolved in water or chemicals after the print is complete.
Fine-Tuning Print Quality
Small adjustments to slicer settings can significantly improve print quality. Here’s how to optimize some key parameters:
1. Retraction Settings:
Prevent stringing and oozing by fine-tuning retraction distance and speed. For example, increasing the retraction distance by 0.5 mm can eliminate unwanted filament trails.
2. Shell Thickness:
Increasing shell thickness (e.g., from 0.8 mm to 1.2 mm) improves the strength of outer walls, making your model more durable.
3. Cooling Fans:
For detailed prints, ensure the cooling fans are set to the right speed. Slower fan speeds can enhance adhesion for taller sections, while faster speeds help solidify intricate features quickly.
Troubleshooting Advanced Settings
Experimenting with advanced features can occasionally lead to issues like over-extrusion, weak supports, or uneven surfaces. Here are some tips to troubleshoot common problems:
- Over-Extrusion: Lower the flow rate or extrusion multiplier to prevent excess material buildup.
- Weak Supports: Increase support density or adjust the Z-axis offset to ensure stability.
- Uneven Surfaces: Check for inconsistencies in the print bed and recalibrate if necessary.
External Resources:
For an in-depth guide, check out this article on advanced slicer settings for better print quality [all3dp.com/slicer-settings-tips].
Pushing Boundaries with Advanced Techniques
Mastering advanced slicer features unlocks the ability to tackle ambitious projects with confidence. Whether you’re fine-tuning retraction settings to eliminate stringing or leveraging dynamic layer heights for optimized prints, these techniques bring a professional polish to your work.
With practice and persistence, you’ll find that advanced slicer settings don’t just enhance your prints—they also deepen your understanding of the 3D printing process as a whole.
Back to Top6. Troubleshooting Common Slicer Issues
No matter how experienced you are with 3D printing, slicer issues can occasionally derail your progress. These problems can range from minor inconveniences, like uneven layers, to major headaches, such as failed prints or unusable G-code. Learning how to diagnose and resolve slicing errors like missing layers is essential for achieving consistent results and maximizing your productivity.
This section explores common slicer problems, their underlying causes, and practical solutions to get your prints back on track.
Common Slicer Errors and Solutions
1. Missing Layers or Gaps in Prints
One of the most common issues is the appearance of missing layers or visible gaps in the printed object. These errors usually stem from incorrect slicer settings or filament-related factors.
Possible Causes:
- Layer Height: If your layer height exceeds 75% of the nozzle diameter, the layers won’t adhere properly.
- Infill Overlap: Poor overlap between the infill and outer walls can result in visible gaps.
Solutions:
- Adjust Layer Height: Ensure the layer height is within the recommended range. For a 0.4 mm nozzle, use a layer height of 0.1-0.3 mm.
- Increase Infill Overlap: Most slicers allow you to set the infill overlap as a percentage (e.g., 10%-15%).
External resource: Learn more about fixing slicing errors [autodesk.com/netfabb/fixing-slicer-errors].
2. Unwanted Supports
Default slicer settings often generate excessive or poorly placed support structures, which can waste filament and damage the surface finish of your model.
Possible Causes:
- Overly Conservative Support Settings: Slicers might add supports in areas that don’t truly need them.
- Improper Overhang Angles: The slicer may apply supports to geometries with angles that can be printed without them.
Solutions:
- Adjust Overhang Angle: Increase the overhang angle threshold (e.g., from 45° to 60°) to reduce unnecessary supports.
- Use Custom Supports: Tools like how to create custom supports in Cura slicer empower users to manually place supports only where needed.
3. Failed Prints from Invalid G-Code
Sometimes, a slicer may generate invalid or corrupted G-code, causing your printer to behave unpredictably or fail mid-print.
Possible Causes:
- Corrupted STL Files: Errors in the 3D model can lead to unusable slicing results.
- Outdated Software: Running an outdated slicer version can produce flawed G-code.
Solutions:
- Repair STL Files: Tools like Netfabb and MeshLab can fix common 3D model issues, such as non-manifold edges.
- Update the Slicer Software: Ensure you’re using the latest version of your slicer. Developers frequently release patches to address bugs and improve performance.
External resource: STL file repair tips [meshmixer.com/troubleshooting-tips].
Diagnosing Printer-Specific Issues
While slicer software is often blamed for print failures, the actual culprit may sometimes lie with your printer. For example, poor print bed adhesion or uneven extrusion can mimic slicer-related issues.
How to Differentiate:
- Inspect the G-Code Preview: Most slicers allow you to preview the print layers and movements. If the G-code looks correct, the problem likely lies with your hardware.
- Print a Test File: Use a known good file (e.g., a calibration cube) to rule out printer issues.
Pro Tips for Avoiding Slicer Problems
1. Start Simple:
Begin with default slicer profiles before making custom adjustments. This reduces the chance of errors caused by conflicting settings.
2. Use the Visualization Tool:
All modern slicers include a visualization tool that shows each layer of the sliced model. Review this carefully to catch potential issues before printing.
3. Experiment with Test Models:
Print small calibration models to identify and resolve specific issues with layer adhesion, supports, or infill density.
Personal Anecdote:
I once worked with a hobbyist trying to print a mechanical gear for a robotics project. Despite hours of tweaking slicer settings, the printed gears were loose and non-functional. The culprit? A corrupted STL file that introduced small but critical errors during slicing. After repairing the file using Netfabb, the gears printed perfectly, highlighting the importance of verifying your model before slicing.
The Importance of Iteration in 3D Printing
Troubleshooting slicer issues isn’t just about fixing problems—it’s also a chance to refine your skills and deepen your understanding of the 3D printing process. Each challenge you overcome brings you one step closer to mastering the art of slicing and printing.
Whether it’s adjusting layer height to eliminate gaps, learning how to optimize slicer settings for better prints, or repairing models with dedicated tools, persistence is the key to success.
Back to Top7. The Role of Slicers in Optimizing Print Quality
The slicer software you use is one of the most influential factors in determining the final quality of your 3D prints. A well-optimized slicer ensures that every aspect of your print—from structural strength to surface finish—is tailored to your specific needs. This section delves into how slicer settings impact print quality and how you can leverage advanced tools and best practices to achieve exceptional results.
Surface Finish and Detail
The surface finish of your print is directly tied to settings like layer height and print speed. Fine-tuning these parameters allows you to strike the perfect balance between detail and efficiency.
Layer Height:
A lower layer height (e.g., 0.1 mm) produces smooth surfaces and sharp details, making it ideal for decorative or display pieces. Conversely, a higher layer height (e.g., 0.3 mm) accelerates print times and is suitable for functional prototypes where aesthetics are secondary.
Print Speed:
While faster speeds reduce production time, they can introduce imperfections, such as uneven extrusion or visible lines. Slower speeds improve adhesion and detail, ensuring a polished appearance.
Anecdote:
I once collaborated with a designer creating an intricate vase with delicate patterns. By reducing the layer height to 0.1 mm and lowering the print speed, they achieved a stunning, glass-like finish that wowed their clients.
Structural Integrity
The internal architecture of your print plays a crucial role in its strength and durability. Slicer settings like infill density, infill pattern, and shell thickness allow you to customize your model’s resilience to meet functional requirements.
Infill Density and Pattern:
Higher infill percentages (e.g., 50%-100%) provide increased strength, while lower percentages (e.g., 10%-20%) conserve material for non-functional prints. Patterns like gyroid offer optimal strength-to-material ratios, making them ideal for load-bearing parts.
Shell Thickness:
Thicker shells improve the robustness of outer walls, ensuring that your model can withstand wear and tear. For example, increasing shell thickness from 0.8 mm to 1.2 mm might make the difference between a durable prototype and a fragile one.
Best Practices:
For functional parts, combine high infill density with strong shell thickness to achieve maximum durability.
Material Efficiency
Optimizing slicer settings isn’t just about achieving quality—it’s also about minimizing waste. Features like support placement, retraction settings, and cooling controls help reduce filament usage without sacrificing performance.
Efficient Support Structures:
By carefully adjusting overhang angles and using custom supports, you can limit the material used for stabilization. This approach is especially useful for complex designs with large overhangs.
Retraction Settings:
Proper retraction settings prevent filament stringing, reducing material waste and saving time during post-processing.
Cooling Controls:
Cooling settings directly affect filament adhesion and print speed. Faster cooling solidifies layers quickly, while slower cooling enhances adhesion for better stability.
Troubleshooting Quality Issues
Even with optimized settings, print quality issues can sometimes arise. Here’s how to address common problems:
1. Uneven Layer Lines:
Check the layer height and nozzle temperature to ensure consistency. Lowering the temperature by 5-10°C can often resolve extrusion-related issues.
2. Weak Adhesion:
Use features like a brim or raft to improve bed adhesion for taller or complex prints.
3. Over-Extrusion:
Lower the flow rate to prevent excess material buildup. Most slicers allow this adjustment in the extrusion multiplier settings.
External resource: Guide to slicer troubleshooting [all3dp.com/slicer-troubleshooting-guide].
Personal Anecdote:
A hobbyist I assisted was struggling with weak adhesion and gaps in their functional parts. By increasing the infill density, switching to a gyroid infill pattern, and enabling a raft, their prints dramatically improved in strength and consistency. This case reinforced the importance of carefully selecting slicer settings to meet specific project demands.
Slicers: The Key to Print Excellence
Whether you’re printing a decorative model or a load-bearing component, slicer software is the architect that ensures your vision translates into reality. By mastering settings like layer height, infill density, and support structures, you gain the ability to customize every aspect of your prints for quality, efficiency, and durability.
As you refine your slicer skills, you’ll discover how small adjustments—like modifying cooling speeds or optimizing shell thickness—can produce big results. With persistence and creativity, slicer software becomes your most powerful tool in the art of 3D printing.
Back to Top8. Plugins and Add-Ons for Enhanced Slicing Performance
Slicer software is powerful on its own, but with the help of plugins and add-ons, you can elevate your workflow to new heights. These tools extend the functionality of slicer software, offering greater customization, automation, and control. Whether you need remote monitoring, advanced support placement, or multi-material capabilities, there’s a plugin or add-on tailored to your needs.
Unlocking New Possibilities with Plugins
Plugins are small software extensions that integrate seamlessly with slicer programs. They’re designed to enhance or add specific features, making your 3D printing experience smoother, faster, and more efficient. Slicer software like Cura and PrusaSlicer lead the charge in plugin integration, giving users access to a wide variety of options.
Popular Plugins for Cura:
- OctoPrint Connection: This plugin enables remote monitoring and control of your printer, allowing you to manage prints from anywhere using a web interface.
- Custom Supports Plugin: A game-changer for complex model stabilization, this tool lets users manually place support structures, ensuring precise control and reduced material usage.
- Material Cost Calculator: Automatically calculates the cost of your print based on filament usage, perfect for budgeting or small business applications.
PrusaSlicer Add-Ons:
- ColorPrint: This tool allows you to create stunning multi-color prints by pausing your printer at specific layers to change filament. Ideal for creative projects or branding designs.
- Experimental Features: PrusaSlicer frequently introduces beta add-ons for advanced users to test cutting-edge developments.
Enhancing Resin Printing with Specialized Tools
Resin printing requires a different approach to slicing compared to FDM (filament-based) printing. Tools like Lychee Slicer stand out for their resin-focused plugins, which simplify tasks like support optimization and adaptive layer heights.
Lychee Features:
- Island Detector: Identifies unsupported areas in resin prints and automatically generates supports to avoid failed prints.
- Custom Exposure Settings: Fine-tune UV light exposure for better curing and detail retention.
- Advanced Hollowing Tool: Creates hollow models to reduce resin usage while maintaining structural integrity.
How Plugins Streamline Workflow
By incorporating plugins into your slicer software, you can save valuable time and resources. Here are three ways plugins enhance workflow:
1. Automation:
Tools like OctoPrint allow you to automate the printing process, reducing the need for constant monitoring.
2. Customization:
With plugins like Cura’s Custom Supports, you gain precise control over complex prints, improving quality while minimizing waste.
3. Efficiency:
Material calculators and cost estimators streamline budgeting for projects, especially useful for makers or small businesses producing on-demand parts.
Troubleshooting Plugin Integration
While plugins can be incredibly helpful, they occasionally cause conflicts or performance issues. Here’s how to troubleshoot common plugin-related problems:
- Incompatible Versions: Always check that your slicer software and plugin versions align.
- Performance Drops: Some plugins may slow down slicer software due to heavy processing requirements. Disable unnecessary extensions to optimize speed.
- Error Messages: Review plugin documentation or seek advice from community forums to resolve technical issues.
Personal Anecdote: A Plugin That Saved the Day
I once assisted a maker printing a multi-color chess set. Their slicer lacked native support for switching filaments mid-print, causing frustration as they manually paused their printer at specific layers. By introducing PrusaSlicer’s ColorPrint Add-On, they automated the filament change process, resulting in a flawless, vibrant chess set and saving hours of manual adjustments. This experience reinforced the impact plugins can have on simplifying even the most complex projects.
Exploring Advanced Add-Ons
While plugins focus on specific tasks, slicer add-ons often deliver broader enhancements to the overall software experience. For example, Fusion 360 includes tools like Mesh Enabler, which converts mesh files into solids for easier editing.
Fusion 360 Add-On Features:
- PCB Integration: Streamline electronics design by integrating PCB layouts directly into 3D modeling workflows.
- Slicing Compatibility: Export models optimized for slicing with advanced settings already baked in.
Where to Find Plugins and Add-Ons
The slicer software communities are rich with resources for finding and installing plugins and add-ons. Here are some starting points:
- Cura Marketplace: Access hundreds of plugins directly from the slicer interface.
- Prusa Community Forums: A hub for user-developed extensions and beta testing opportunities.
- Lychee Slicer Tutorials: Resin-focused guides to advanced tools.
External resource: Recommended plugins for slicers [all3dp.com/best-cura-plugins-and-add-ons].
Expanding Your Capabilities with Plugins
Plugins and add-ons transform slicer software from a standard tool into a powerhouse of functionality. By exploring options like multi-material 3D printing plugins or incorporating advanced resin-focused tools, you’ll unlock new levels of precision, customization, and efficiency.
These extensions aren’t just convenient—they’re a gateway to innovation, allowing you to tackle ambitious projects with confidence and creativity. With the right plugins in your arsenal, your slicer software becomes an all-in-one solution for even the most complex 3D printing workflows.
Back to Top9. Future of Slicer Software: Integrating AI and Automation
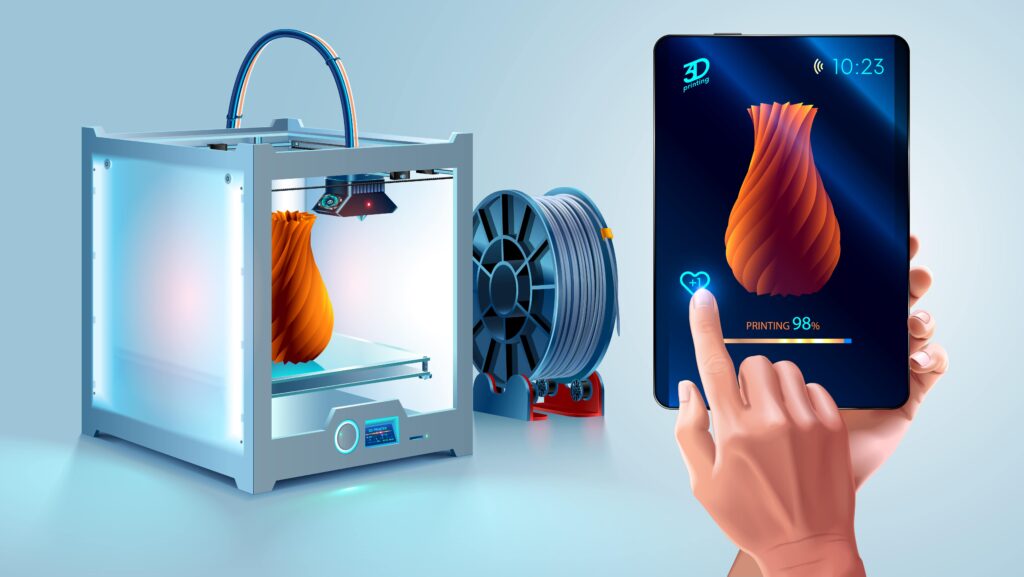
As 3D printing evolves, so does its ecosystem of tools and technologies. Slicer software, once limited to basic slicing tasks, is now embracing artificial intelligence (AI) and automation to deliver smarter, faster, and more efficient workflows. These advancements are not just futuristic—they are already reshaping how users approach 3D printing, from optimizing settings to minimizing errors in real time.
How AI is Revolutionizing Slicer Software
Artificial intelligence enables slicer software to perform tasks that once required significant expertise or manual intervention. By analyzing 3D models and learning from user behavior, AI can make recommendations that optimize print quality and reduce waste.
AI-Driven Design Optimization
One of the most promising applications of AI in slicer software is AI-powered slicer software for better print quality. Advanced algorithms analyze your model’s geometry, identifying areas where layer height adjustments or support placement can improve outcomes.
For example, AI can:
- Automatically detect overhangs and suggest support structures.
- Recommend adaptive layer heights for balancing speed and detail.
- Optimize infill patterns for strength without excessive material use.
Error Detection and Prevention
AI excels in identifying issues before printing even begins. Some slicer programs now include features like automated checks for non-manifold edges or gaps in the model. By catching errors early, users save time and avoid wasted filament on failed prints.
Automation in 3D Printing Workflows
Automation in slicer software goes hand-in-hand with AI, streamlining repetitive tasks and reducing the need for constant user input. Here are some ways automation is enhancing the 3D printing process:
Real-Time Print Monitoring
Paired with hardware tools like OctoPrint, slicer software can now offer real-time monitoring and adjustments. For instance, if a sensor detects that a layer has shifted, the software can pause the print and suggest corrective actions.
Smart Presets
Slicer software is beginning to use machine learning to adapt presets based on user preferences. For example, if you frequently print functional prototypes, the slicer can learn to prioritize strength-related settings like higher infill density and thicker walls.
Automated Multi-Material Printing
Multi-material printing is notoriously complex, but automation simplifies it by handling tasks like filament changes and ensuring proper alignment. Some slicers now allow you to set up these workflows with just a few clicks.
Anecdote:
A small business owner I worked with recently upgraded to slicer software with AI-driven error detection. Previously, they struggled with failed prints due to overlooked geometry issues. The new system automatically flagged problematic areas in their designs, saving them countless hours and reducing wasted material. This experience highlighted the value of AI in enhancing both productivity and sustainability.
Trends Shaping the Future
The advancements we see today are just the beginning. Emerging trends suggest that slicer software will become even more intelligent and integrated in the coming years.
1. Machine Learning for Personalization
Machine learning algorithms are being used to customize slicer software for individual users. Imagine a slicer that remembers your preferred layer height, infill patterns, and support settings, then applies them automatically to future projects.
2. Integration with IoT
As 3D printers increasingly become part of the Internet of Things (IoT), slicer software will integrate with smart devices to enhance control. For example, you could remotely start a print job from your smartphone or receive notifications about filament levels in real time.
3. Sustainability Through AI
AI is also driving sustainability in 3D printing by optimizing material usage and energy consumption. Future slicers might analyze your design and recommend ways to minimize filament waste or reduce print times without compromising quality.
Challenges in Implementing AI and Automation
While the benefits of AI and automation are clear, they come with their own set of challenges:
- Complexity for Beginners: Advanced features may intimidate new users, requiring improved tutorials and onboarding experiences.
- Compatibility Issues: Not all printers support the latest AI and automation tools, limiting access for some users.
- Cost Barriers: High-end slicer software with advanced features often comes with a steep price tag.
However, as these technologies mature, we can expect greater accessibility and affordability.
The Road Ahead
The integration of AI and automation into slicer software marks an exciting chapter in the evolution of 3D printing. These advancements are democratizing access to professional-quality results, empowering users to focus on creativity rather than troubleshooting.
Whether you’re exploring AI-powered slicer software for better print quality or harnessing automation for multi-material printing, the possibilities are growing every day. As slicer software continues to evolve, it promises a future where 3D printing is faster, smarter, and more accessible than ever before.
External resource: Trends in AI and slicer technology [all3dp.com/ai-slicer-software-trends].
Back to Top10. Glossary of Splicer Software Terms
| Keyword | Definition |
|---|---|
| Layer Height | Thickness of each layer in a 3D print, impacting resolution and print time. |
| G-code | The command language used by 3D printers to execute print instructions. |
| Infill Pattern | The internal structure of a print that affects strength and material usage. |
| Support Structures | Temporary printed elements used to hold up overhanging parts during printing. |
| Custom Supports | Manually placed supports for stabilizing complex designs. |
| Dynamic Layer Height | Automatically adjusts layer thickness to balance print speed and detail. |
| Overhang Angle | The angle at which overhanging parts are considered stable without supports. |
| Retraction Settings | Parameters that control filament retraction to prevent stringing and oozing. |
| Multi-Material Printing | Printing using multiple filament types or colors in a single object. |
| Bed Adhesion | Techniques like brims or rafts to improve print stability on the build plate. |
| Shell Thickness | The thickness of the outer walls of a print, enhancing durability. |
| Filament Flow Rate | The rate at which filament is extruded, affecting consistency and precision. |
11. Summary: Unlock the Power of Slicer Software
Slicer software is the engine driving every successful 3D print. From transforming digital models into G-code to fine-tuning settings like layer height, infill patterns, and support structures, these tools empower you to bring your ideas to life. With advanced features like dynamic layer heights, custom supports, and emerging AI-driven technologies, slicer software offers limitless possibilities to elevate your designs.
By mastering the basics, exploring advanced techniques, and incorporating plugins or add-ons, you’ll unlock a world of precision, efficiency, and creativity. Whether you’re a beginner experimenting with pre-configured profiles or a professional tackling complex multi-material projects, slicer software is your gateway to 3D printing success.
Call to Action: Elevate Your 3D Printing Journey
Ready to dive deeper into the possibilities of slicer software? Use this guide as your starting point, then explore complementary resources to expand your knowledge and skills:
- Discover the best slicer software for beginners and professionals [example.com/best-slicer-software].
- Learn how to troubleshoot common slicing errors [example.com/troubleshooting-slicer-issues].
- Experiment with plugins and add-ons to enhance your workflow [example.com/slicer-plugins-guide].
Don’t stop here—continue exploring, experimenting, and refining your techniques. The more you master slicer software, the more ambitious your 3D printing projects can become. Your next groundbreaking design is just a layer away!
Is you design complete? Maybe you need a 3D modeling software?

