Cura Slicer Beginner Tips: Mastering Your First Prints

All the Cura Slicer beginner tips you need to get started.
1. Introduction to Cura Slicer
What is Cura?
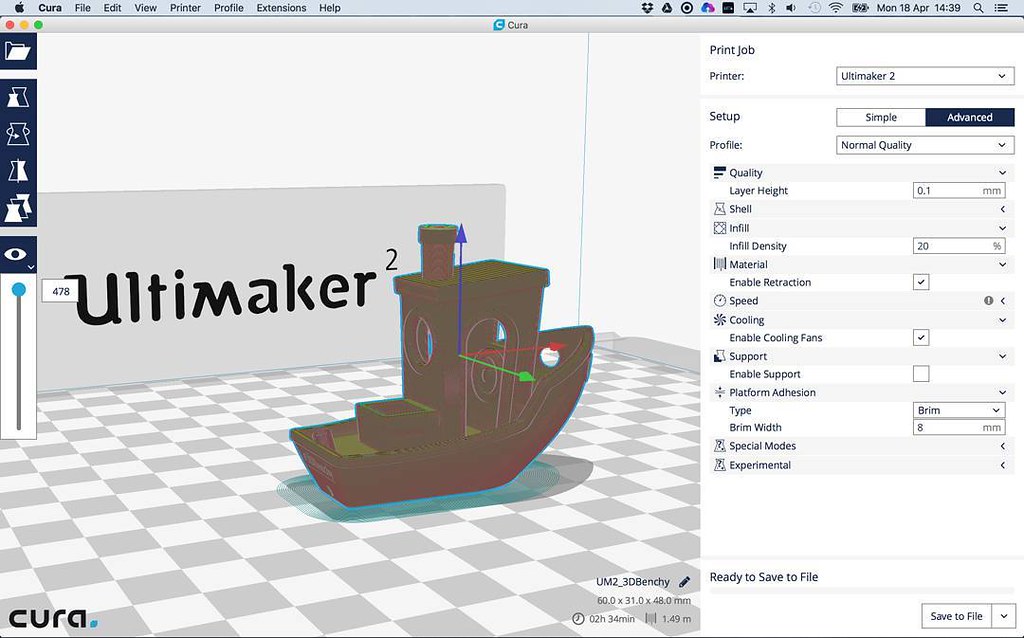
Ultimaker Cura is one of the most widely used 3D printing slicers, known for its powerful features, beginner-friendly interface, and extensive customization options. As a free, open-source software, Cura enables users to convert 3D models into printable G-code while optimizing settings for better adhesion, quality, and speed.
Unlike more advanced slicers such as PrusaSlicer or Simplify3D, Cura offers a straightforward workflow with default profiles that work well right out of the box. However, learning its core settings can significantly improve print quality and reliability.
Why Choose Cura Over Other Slicers?
Cura, as 3D Printer Software, stands out because it balances ease of use with powerful features, making it a great choice for beginners. Compared to other slicers:
- Cura vs. PrusaSlicer: Cura provides a more intuitive interface, while PrusaSlicer offers advanced control over supports and material profiles.
- Cura vs. Simplify3D: Simplify3D excels in precise control of custom supports, but Cura is free and regularly updated with new features.
Cura’s preset material profiles make it easy for beginners to quickly slice and print, while more advanced users can fine-tune settings for optimal performance.
Basic Workflow: How to Use Cura
For beginners, Cura follows a simple step-by-step workflow:
- Import the 3D Model – Load an STL or OBJ file into Cura’s workspace.
- Choose a Printer Profile – Cura supports hundreds of predefined printer profiles, but users can also create custom settings.
- Adjust Print Settings – Modify parameters like layer height, speed, infill percentage, and supports to optimize the print.
- Generate G-code – Cura slices the model into layers and produces G-code instructions for the printer.
- Send to Printer – Transfer the sliced file via USB, SD card, or direct network connection to start printing.
By understanding Cura’s interface, comparison to other slicers, and basic workflow, beginners can start slicing models effectively with minimal effort. In the next section, we’ll explore key Cura settings that dramatically impact print quality!
2. Essential Cura Settings for Beginners
Cura offers hundreds of customizable print settings, but beginners only need to focus on a few key parameters to ensure strong, successful prints. Learning how to optimize layer height, speed, adhesion, and support settings can dramatically improve the quality and reliability of prints.
Layer Height and Print Resolution
Layer height affects both print speed and detail quality. Choosing the right setting depends on whether you prioritize smooth surface details or faster print times:
- High Detail Prints: 0.1mm layer height (slower, but finer detail)
- Balanced Prints: 0.2mm layer height (standard resolution, good for most models)
- Fast Prints: 0.3mm+ layer height (quicker, but rougher details)
For beginners, 0.2mm layer height is a great starting point, providing a good balance of quality and speed.
Print Speed vs. Cooling Settings
Print speed determines how fast the printer moves, but faster speeds can cause poor layer adhesion or misalignment issues. Cura lets users adjust speed based on filament type and model complexity:
- PLA & PETG: 40–60mm/s (standard for reliable quality)
- ABS: 30–50mm/s (slower speed reduces warping risk)
- Overhangs and Small Features: 20–30mm/s (prevents detail loss)
Cooling also plays a role—strong cooling improves PLA prints, but can weaken ABS layer bonding. Adjust settings based on filament needs.
Bed Adhesion Techniques: Preventing Warping
One of the biggest beginner frustrations is poor bed adhesion, which causes warping or failed first layers. Cura provides several adhesion options to improve first-layer stability:
- Brim: Adds a thin extra layer around the print base to reduce lifting.
- Raft: Creates a foundation structure under the print for better adhesion (great for ABS).
- Skirt: A simple outline that helps prime the nozzle but doesn’t add adhesion benefits.
For beginners using PLA or PETG, a brim is often enough to prevent edge curling and improve stability.
Support Structures: When and How to Use Them
Supports help print overhangs and complex designs, but improper support settings can waste material or cause difficult removal. Cura offers two main support options:
- Normal Supports: Standard structures under overhangs (easy to remove).
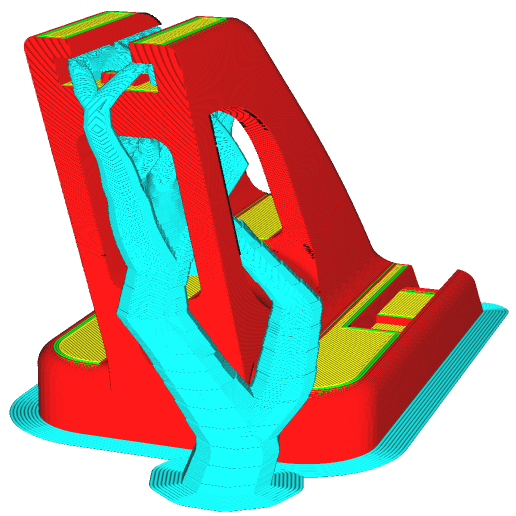
- Tree Supports: More efficient, branched support structures (uses less material).
For beginners, enabling “Tree Supports” provides cleaner removal and better structural efficiency, especially for figurines or models with intricate details.
By adjusting these core Cura settings, beginners can avoid common print failures and get consistent, high-quality results. Next, we’ll cover common Cura problems and how to fix them.
3. Common Cura Problems and How to Fix Them
Even though Cura is user-friendly, beginners often encounter challenges such as stringing, warping, weak layer adhesion, and under-extrusion. Learning how to diagnose and fix these issues will significantly improve print success rates.
Stringing and Oozing: Fixing Excess Filament Trails
Stringing occurs when excess filament drips or stretches between travel moves, leaving thin, unwanted strands on the print. To reduce stringing:
- Increase retraction distance (start with 4–6mm, fine-tune based on filament type).
- Increase retraction speed (around 30–40mm/s prevents excessive extrusion).
- Adjust nozzle temperature (a lower temp reduces oozing, but going too low can cause under-extrusion).
For PETG, slight stringing is common due to its sticky nature—adjusting coasting settings in Cura can help stop excess filament before travel moves.
Warping and Adhesion Failures: Keeping the First Layer Secure
Warping happens when the print’s edges curl upward, causing poor bed adhesion. To fix this:
- Increase bed temperature (PLA: 50–60°C, ABS: 90–110°C, PETG: 70–85°C).
- Use an adhesion aid (glue stick, PEI sheet, blue tape).
- Enable a brim or raft (brims improve adhesion without affecting the print, rafts create a strong base for ABS).
- Avoid cooling too early—for ABS, turn off the fan for the first few layers to prevent excessive shrinkage.
Using an enclosed printer for ABS reduces warping dramatically, as drafts and inconsistent temperatures can cause edge lifting.
Weak Layer Bonding: Improving Print Strength
If layers aren’t sticking properly, prints become fragile and break under stress. To improve layer adhesion:
- Increase extrusion temperature (try +5°C increments).
- Reduce cooling fan speed (especially for ABS).
- Increase perimeter walls (3–5 walls add structural durability).
- Enable gradual infill transitions for more evenly distributed strength.
Layer separation is common when printing ABS in an open setup, so using an enclosure keeps layers bonded correctly.
Gaps and Under-Extrusion: Ensuring Smooth Filament Flow
Under-extrusion causes missing layers and weak prints due to insufficient filament flow. To fix it:
- Check nozzle temperature (filament might not be melting properly).
- Adjust extrusion multiplier (increase flow rate by 2–5% in Cura).
- Verify nozzle cleanliness (clogged nozzles disrupt filament flow).
- Slow down print speed (lower speeds help maintain consistent extrusion).
Under-extrusion is often filament-dependent, so adjusting Cura settings based on material properties ensures consistent results.
By tackling these common Cura issues, beginners can avoid failed prints and improve reliability. Next, we’ll explore advanced tips to push Cura’s capabilities even further!
4. Advanced Tips to Improve Print Quality in Cura
Once you’ve mastered the basics, Cura offers advanced features to fine-tune prints for better strength, efficiency, and aesthetics. Using optimized supports, infill patterns, and extrusion techniques, beginners can significantly improve their print quality.
Using Tree Supports for Cleaner Prints
Cura’s tree supports are a game-changer for models with complex overhangs. Unlike traditional supports, tree supports branch out naturally, using less material while being easier to remove.
Best scenarios for tree supports:
- Organic models (figurines, sculptures)
- Parts with delicate overhangs (thin arms, small protrusions)
- Reducing waste on large prints (tree supports consume less material than normal supports)
To activate tree supports:
- Enable Support Type → “Tree” in Cura’s settings.
- Adjust support density to balance stability and ease of removal.
- Test tree supports on smaller prints before using them on larger models.
Optimizing Infill Patterns for Strength and Efficiency
Cura provides various infill patterns, each serving different functional purposes:
- Grid & Triangles → Balanced strength, great for general prints.
- Gyroid & Cubic → Stronger, great for mechanical parts.
- Lightning Infill → Uses the least material, ideal for cosmetic models.
For functional parts, increase infill density (40%–100%) and use stronger patterns like cubic or gyroid, which offer excellent structural integrity.
Fine-Tuning Flow Rates and Extrusion Multipliers
Flow rate affects how much filament is extruded—adjusting Cura’s flow settings helps fix under- or over-extrusion.
- Lower flow rate (~95%) for better surface quality.
- Increase flow (~105%) for better layer bonding.
- Use extrusion multipliers to improve dimensional accuracy.
Flow rates are highly filament-dependent, so test small calibration prints before applying adjustments to large projects.
Leveraging Cura Plugins and Custom Profiles
Cura’s marketplace plugins enhance functionality, offering:
- Auto bed leveling adjustments
- Advanced nozzle control
- Temperature tuning tools
Creating custom profiles for each filament type ensures optimal settings, saving time when switching between materials.
By using tree supports, optimized infill, precise extrusion tuning, and Cura plugins, beginners can dramatically improve print success while reducing material waste.
Conclusion: Mastering Cura Slicer beginner tips for Better Prints
Cura is a powerful yet beginner-friendly slicer that enables users to optimize print settings, reduce common issues, and enhance quality. By understanding layer height, speed, adhesion techniques, and advanced features like tree supports and optimized infill, beginners can significantly improve print reliability and efficiency. With the right adjustments, Cura helps achieve stronger, cleaner prints while minimizing failed prints and wasted material.
Next Steps: Fine-Tuning Your Cura Experience
- Test different layer heights and speeds to find the right balance between quality and efficiency.
- Use brims, rafts, and bed adhesion tweaks to prevent warping and first-layer failures.
- Optimize support settings, especially tree supports, for cleaner removal and better material efficiency.
- Experiment with infill patterns to achieve stronger, lightweight prints.
- Explore Cura plugins for extra features to further refine your slicing workflow.

Top Plugins for Creating Custom Supports in Slicers
Discover the top plugins for creating custom supports in slicers. reduce waste, and improve print success. Fine-tune slicing for cleaner prints!
Best 3D Modeling Software for Beginners: A Comprehensive Guide
3D modeling is the backbone of digital creation—whether you’re designing prototypes for 3D printing, developing video game assets, or crafting architectural models.


